Cold Email Deliverability in 2026: SPF, DKIM, DMARC Setup Guide
Cold email deliverability has never been more unforgiving. Since February 2024, Google and Yahoo have required bulk senders to authenticate domains with SPF, DKIM, and DMARC, maintain spam complaint rates below 0.3%, and support one-click unsubscribe. In 2026, enforcement is tighter and tolerance is lower. According to a 2026 Martal Group report, roughly 17% of cold emails never reach the inbox due to poor domain authentication, high bounce rates, or spam-triggering content. No amount of clever copywriting compensates for a broken authentication setup.
This guide is built for founders, SDRs, RevOps teams, and growth operators sending cold email from Google Workspace, Microsoft 365, or a dedicated outbound domain. Before you touch a single DNS record, confirm two prerequisites: DNS access for your sending domain and admin rights to your mailbox provider. Then inventory every tool in your stack that sends email on your behalf (CRM, sequencing platform, transactional provider, marketing automation). That inventory is your starting point for everything that follows.
What 'Cold Email Deliverability' Actually Means in 2026
Delivery and deliverability are not the same thing. Delivery means a receiving server accepted your message. Deliverability means it landed in the primary inbox, not spam or the promotions tab. Inbox providers evaluate placement using three trust signals:
The three trust signals inbox providers use to determine placement:
● Identity (Authentication): SPF, DKIM, and DMARC verify you are who you claim to be.
● Reputation (Domain and IP history): Complaint rates, bounce history, and sending patterns build or erode trust over time.
● Engagement (Recipient behavior): Opens, replies, and spam complaints signal whether recipients want your mail.
Authentication is the entry ticket. Without it, your reputation and engagement signals never get a fair hearing. Email authentication is a set of technical standards that verify a sender's identity, prevent spoofing, and give inbox providers a reason to trust your mail.
Map Your Sending Universe Before You Touch DNS
Most teams skip this step and pay for it later with a broken SPF record or a DMARC failure they cannot trace. Before editing any DNS record, document every system that sends email as your domain:
Systems to include in your sender audit:
● Mailbox provider (Google Workspace or Microsoft 365)
● CRM (HubSpot, Salesforce, or similar)
● Cold outreach platform (Instantly, Smartlead, etc.)
● Transactional email service (SendGrid, Postmark, AWS SES)
● Marketing automation tool (Mailchimp, ActiveCampaign, etc.)
Each system needs permission in your SPF record. Each one should be signing with DKIM.
Architecture matters too. Sending cold outreach from your primary domain puts your core brand reputation at risk if complaint rates spike. A dedicated outbound domain (something like mail.yourcompany.com or yourbrand-outreach.com) isolates that risk. Subdomains are a middle ground but require their own SPF, DKIM, and DMARC records. Whatever you choose, document it as a single source of truth so future vendor additions do not silently break your SPF lookup chain.
SPF Record Setup: Authorizing Your Senders Without Breaking Things
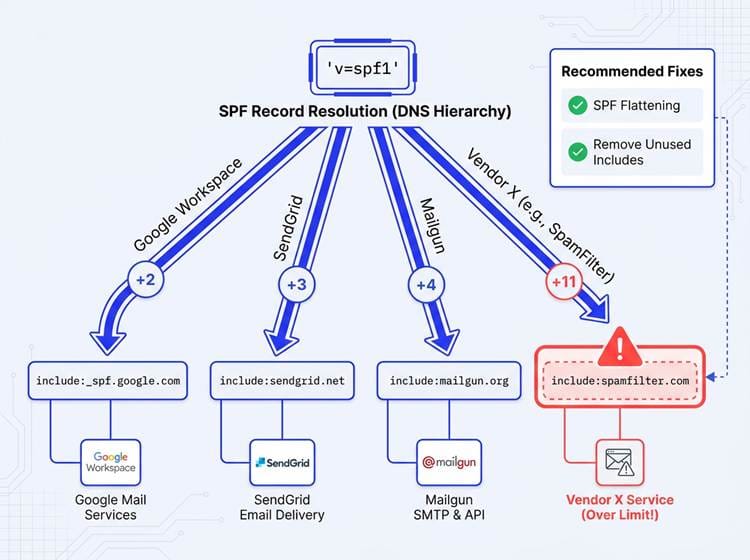
Each 'include' mechanism in your SPF record triggers a separate DNS lookup. Exceeding the 10-lookup cap is one of the most common reasons cold emails fail authentication.
SPF (Sender Policy Framework) tells receiving servers which IP addresses and services are authorized to send mail for your domain. It checks the envelope sender, not the From header your recipient sees. That distinction is critical: SPF alone does not stop display-name spoofing, and it is not a spam filter. Its job is authorization. Start by checking whether you already have an SPF record. Query your domain's TXT records using MXToolbox or a simple `dig TXT yourdomain.com` command. You need exactly one TXT record starting with `v=spf1`. Two SPF records cause immediate failures because receivers only process one.
SPF Patterns You Will Actually Use
Common SPF includes for typical cold outreach stacks:
● Google Workspace: `include:_spf.google.com`
● Microsoft 365: `include:spf.protection.outlook.com`
● HubSpot: `include:_spf.hubspot.com`
● Outbound platforms: check the vendor's documentation for their specific include directive
● Close with `-all` (hard fail) for strict enforcement, or `~all` (soft fail) while you are still validating your full sender list
SPF has a hard limit of 10 DNS lookups per evaluation. Every `include:` directive counts toward that ceiling. Exceed it and receivers treat your record as invalid, resulting in soft-fails or outright rejections. Audit your includes quarterly, remove vendors you no longer use, and treat SPF flattening as a last resort (flattened records require manual updates every time a vendor changes their IP ranges). On dedicated outbound domains where you are confident the sender list is complete, use `-all`. On your primary domain, `~all` gives you a safety net during the transition.
SPF Quick-Reference Table
|
Element |
What
It Does |
When
to Use |
|
`include:` |
Authorizes a third-party
service's IP ranges |
For every vendor that sends as
your domain |
|
`~all` (soft fail) |
Marks unauthorized senders as
suspicious but does not reject |
During initial setup and
testing |
|
`-all` (hard fail) |
Rejects mail from any IP not
explicitly listed |
Once your sender list is
confirmed complete |
|
10-lookup limit |
Maximum DNS lookups allowed
per SPF evaluation |
Monitor continuously; audit
quarterly |
DKIM Setup: The Signature That Proves Your Mail Is Genuine
DKIM (DomainKeys Identified Mail) attaches a cryptographic signature to every outgoing message. The receiving server fetches your public key from DNS and verifies that signature against the message content. A match confirms the message has not been tampered with in transit and genuinely originated from an authorized source. This is the signal inbox providers weight most heavily for domain alignment.
Use a 2048-bit key minimum. 1024-bit keys are considered weak, and some providers now reject them outright. Your selector name (the prefix before `._domainkey.yourdomain.com`) can be anything, but naming it with a date or vendor reference (such as `google2024` or `outreach-v2`) makes future key rotations easier to track.
DKIM in Google Workspace vs Microsoft 365
Google Workspace: Navigate to Admin Console > Apps > Google Workspace > Gmail > Authenticate email. Generate a new DKIM key for your domain, copy the TXT record value, publish it in DNS, then return to the Admin Console to start authentication. Allow up to 48 hours for DNS propagation before verifying.
Microsoft 365: Open the Defender portal under Email and Collaboration > Policies and Rules > Threat Policies > DKIM. Enable DKIM for your domain and publish the two CNAME records Microsoft provides. Once DNS propagates, confirm signing is active by sending a test message and checking the headers for a `DKIM=pass` result.
If you use a cold outreach platform, check whether it signs with your domain or its own. Signing with your domain is strongly preferable for DMARC alignment, and it is worth demanding from any vendor before you commit to their platform. For more on building the full outbound stack around these tools, see this guide on building a prospecting stack.
DMARC Setup: Turning Authentication Into Policy
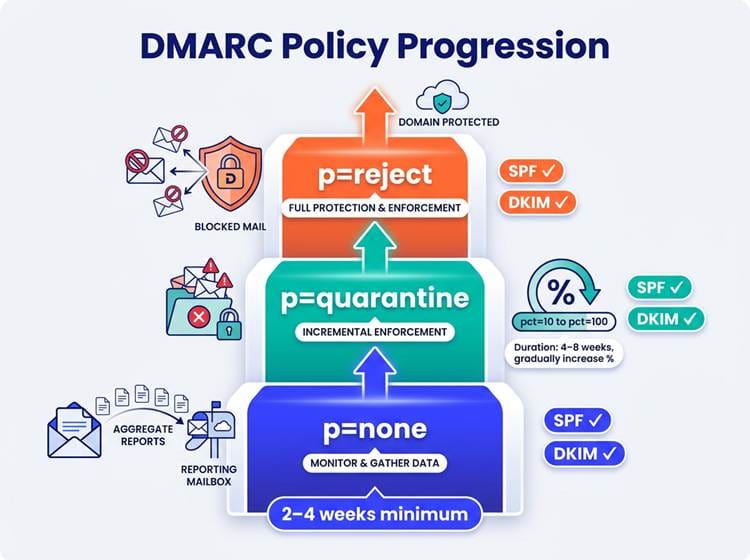
Roll out DMARC gradually: start with visibility at p=none before enforcing quarantine or reject
DMARC builds on SPF and DKIM by adding alignment checks and a policy instruction. It tells receiving servers what to do when a message fails authentication: nothing (`p=none`), route it to spam (`p=quarantine`), or reject it outright (`p=reject`). It also sends aggregate reports to an address you specify, giving you visibility into who is sending mail as your domain. Yahoo's sender guidelines require a DMARC record at minimum `p=none` for all senders, with higher enforcement expected for volume senders.
Start with `p=none` and an `rua` tag pointing to a mailbox or a DMARC reporting service. Spend two to four weeks reading those reports. You will often discover forgotten services, old marketing tools, or a vendor sending as your domain without proper authentication. Fix those sources before moving to any enforcement policy.
A DMARC Record You Can Actually Live With
A safe starter record: `v=DMARC1; p=none; rua=mailto:dmarc-reports@yourdomain.com; adkim=r; aspf=r; pct=100`. The `adkim=r` and `aspf=r` tags set relaxed alignment, which allows subdomains and some vendor configurations to pass without breaking. Strict alignment (`s`) is more secure but will fail legitimate mail if your sending infrastructure uses different subdomains. Move to `p=quarantine` once your reports show clean alignment across all senders, then to `p=reject` when you are confident. Use `pct=` to roll out enforcement incrementally (for example, `pct=10` applies the policy to only 10% of failing mail during testing).
DMARC Policy Progression Cheat Sheet
|
Policy |
Behavior |
When
to Use |
Duration |
|
`p=none` |
No enforcement; collects
aggregate reports only |
Day 1 of DMARC deployment |
2 to 4 weeks minimum |
|
`p=quarantine` with `pct=10` |
Routes 10% of failing mail to
spam |
After reports show most
senders aligned |
1 to 2 weeks per increment |
|
`p=quarantine` with `pct=100` |
Routes all failing mail to
spam |
After incremental testing is
clean |
2 to 4 weeks |
|
`p=reject` |
Rejects all failing mail
outright |
Full confidence in sender
alignment |
Ongoing, with monthly report
reviews |
Verifying That Everything Works Before You Scale
After publishing your records, wait for DNS propagation (up to 48 hours, usually faster). Send a test message to a Gmail or Outlook address you control and open the raw message headers. You are looking for three passing verdicts:
Header checks to confirm before scaling:
● `spf=pass` confirming your sending IP is authorized
● `dkim=pass` confirming the cryptographic signature matches your published key
● `dmarc=pass` confirming both SPF and DKIM align with your From domain
If any one of them shows a failure or neutral result, the header will usually indicate which domain or selector caused the problem. Trace it back to your sender inventory and fix the offending record.
All three pass but you are still landing in spam? Authentication is not the issue. Inbox placement at that point comes down to domain reputation (age, sending history, complaint rate), content signals (link-heavy messages, spam trigger phrases), and list quality. No SPF record rescues a campaign sent to a list full of invalid addresses.
Common Pitfalls That Quietly Kill Email Deliverability
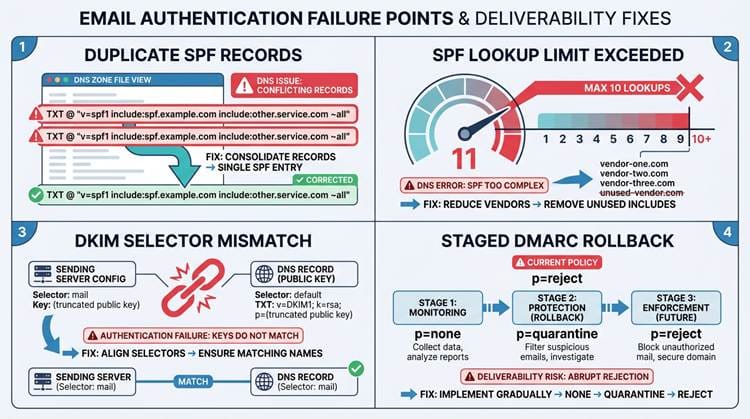
Four authentication mistakes that silently damage deliverability, and how to fix each one
The most frequent authentication errors and their fixes:
● Two SPF records: DNS allows only one `v=spf1` TXT record per domain. Merge all includes into a single record immediately.
● Exceeding the 10-lookup limit: Audit your includes, remove dead vendors, and avoid nested includes that chain into additional lookups.
● DKIM not signing: Confirm DKIM is enabled in your provider's admin panel and the correct selector is published in DNS. Verify by inspecting message headers directly.
● Jumping to `p=reject` too early: If you enforce before cleaning up your sender list, you will block legitimate mail. Roll back to `p=none`, fix alignment issues, then re-enforce gradually using `pct=`.
● Ignoring DMARC reports: Aggregate reports reveal unauthorized senders and alignment failures. Skipping them means flying blind when you move to enforcement.
Beyond Authentication: The Full Cold Email Deliverability Checklist
Authentication is the floor, not the ceiling. Domain and mailbox warm-up matters just as much for new sending domains. Follow this ramp-up cadence:
Warm-up and scaling best practices:
● Start at 20 to 30 emails per day on a new domain.
● Increase volume by 20 to 30% each week.
● Keep sending windows consistent (same time blocks daily).
● Avoid sudden volume spikes, which are a strong spam signal regardless of authentication quality.
● Monitor bounce rates and complaint rates weekly during ramp-up.
List quality is a direct deliverability lever. High bounce rates and spam complaints erode domain reputation faster than almost anything else. Enriching your prospect data before sending reduces invalid addresses and sharpens targeting. The lead enrichment workflow guide walks through the full setup for outbound teams. Pair that with strong cold email best practices to keep engagement healthy. The average cold email reply rate sits around 3.43%, but campaigns using advanced personalization and precise targeting regularly exceed 10%.
Where Bitscale Fits Into Your Deliverability Stack
Bitscale connects directly to the data quality side of deliverability. Work email lookup and contact enrichment reduce the invalid addresses that drive up bounce rates. AI prospect research with intent and buying signals helps you send fewer, better-targeted emails. Smaller, more relevant sends produce higher engagement rates, which in turn improve domain reputation over time. Bitscale's CRM sync and outbound tool integrations also keep your sending stack consistent, so the domains and addresses your tools send from stay aligned with the DNS and authentication setup you have built. If you are still building out the prospecting side, start by learning how to find someone's email before worrying about scale.
DNS Record Cheat Sheet: SPF, DKIM, and DMARC
|
Record |
Type |
Example
Value |
Key
Rule |
|
SPF |
TXT |
`v=spf1
include:_spf.google.com include:spf.protection.outlook.com -all` |
One record per domain; max 10
DNS lookups |
|
DKIM |
TXT or CNAME |
`google2024._domainkey.yourdomain.com`
pointing to provider-generated value |
2048-bit key minimum; rotate
annually |
|
DMARC |
TXT |
`v=DMARC1; p=none;
rua=mailto:dmarc@yourdomain.com; adkim=r; aspf=r` |
Start at p=none; enforce only
after report review |
Your Cold Email Authentication Baseline for 2026
The sequence is straightforward. Map every sender in your stack. Publish a clean SPF record that covers all of them. Enable DKIM with a 2048-bit key in your mailbox provider and any outbound tools that support domain-level signing. Launch DMARC at `p=none` to collect visibility. Verify all three pass in message headers. Then enforce gradually as your reports confirm alignment.
The ongoing work is maintenance. Review DMARC aggregate reports monthly. Rotate DKIM keys at least annually. Audit your SPF includes every time you add or remove a sending tool. Cold email deliverability is not a one-time setup. It is a living part of your outbound infrastructure, and keeping it clean with tools like Bitscale to ensure high data quality is one of the highest-return investments you can make for sustained outbound performance.
Frequently Asked Questions
Do I need a separate domain for cold email outreach in 2026?
Not strictly required, but strongly recommended. Sending cold outreach from your primary domain means any reputation damage from complaints or bounces affects your core brand email. A dedicated outbound domain (for example, yourbrand-mail.com) isolates that risk. Set up full SPF, DKIM, and DMARC on the outbound domain just as you would on your primary, and warm it up before scaling.
What should I set my SPF record to if I use Google Workspace plus an outbound tool?
Combine both into a single TXT record: `v=spf1 include:_spf.google.com include:[your-outbound-tool-spf] -all`. Replace `[your-outbound-tool-spf]` with the include directive from your vendor's documentation. Keep the total DNS lookup count under 10 and verify the final record with a tool like MXToolbox.
How do I know my DKIM setup is actually signing my cold emails?
Send a test email to a Gmail address you control, open the message, and view the original/raw headers. Look for a `DKIM=pass` line that references your domain and selector. If you see `DKIM=fail` or no DKIM header at all, check that DKIM signing is enabled in your provider's admin panel and that the correct TXT record is published and propagated in DNS.
What's a safe DMARC setup to start with so I don't block legitimate mail?
Start with `v=DMARC1; p=none; rua=mailto:dmarc@yourdomain.com; adkim=r; aspf=r`. The `p=none` policy means no mail is blocked while you collect aggregate reports. Use those reports to identify all services sending as your domain and confirm they pass SPF and DKIM alignment. Only move to `p=quarantine` or `p=reject` after your reports show consistent passing results across all legitimate senders.
Why am I still landing in spam even when SPF, DKIM, and DMARC all pass?
Authentication proves identity; it does not guarantee inbox placement. If all three pass and you still hit spam, the issue is likely domain or IP reputation (new domain, previous spam complaints, or a shared IP with bad history), list quality (high bounce rates signal poor data), or content (link-heavy messages, spam trigger phrases, or no plain-text version). Focus on warming your domain gradually, cleaning your list with enrichment tools, and keeping complaint rates well below 0.3%.